
Image Courtesy Unsplash
As the Bitcoin ecosystem matures, new technologies are emerging to tackle Bitcoin’s scalability and interoperability challenges. One key advancement is the ability to move tokens from Bitcoin’s Layer 1 to Layer 2 networks, such as Starknet.
If you’re looking to expand your BitcoinFi activity, this guide will introduce you to the basics of bridging BTC to Layer 2 and walk you through the process of getting started with tools like the Xverse wallet and the StarkGate bridge.
TL;DR
- Bridging BTC from Bitcoin Layer 1 to Layer 2 networks like Starknet unlocks new BTCFi opportunities.
- You’ll need the Xverse Starknet wallet and StarkGate bridge to complete the process.
- Starknet offers faster, cheaper transactions thanks to zk-rollup technology.
- Bridging allows you to use BTC in DeFi apps for swapping, staking, and more.
What Is a Bridge?
A blockchain bridge connects two independent networks, enabling assets to be transferred seamlessly between them.
In the context of Bitcoin and Starknet, it enables users to send BTC from the Bitcoin network to Starknet and back. Starknet leverages zk-rollup technology to offer lower fees and faster transactions, making it a strong choice for those exploring BitcoinFi.
Using the StarkGate bridge alongside the Xverse wallet makes transferring assets between Bitcoin and Starknet straightforward and accessible.
Why Bridge Tokens?
Bridging tokens from Bitcoin to a network like Starknet provides several benefits:
- Scalability: Starknet uses zk-Stark technology, offering improved speed and lower transaction fees.
- DeFi access: Unlock the ability to use your Bitcoin for decentralized finance applications, including swapping, staking, and liquidity provision.
- Interoperability: Bridging your assets makes Bitcoin interoperable with other blockchain networks, creating opportunities beyond its native blockchain.
Step-by-Step Guide to Bridge Bitcoin to Starknet
Here’s how to bridge tokens from Bitcoin L1 to Starknet.
- Set Up Your Wallet
Download and set up Xverse wallet on your mobile device or as a browser extension.
Once installed, create a new wallet or import an existing one following the wallet’s setup instructions.
Visit the StarkGate Bridge and connect your Xverse wallet by selecting the “Connect wallets” button.

- Fund Your Wallet
Add Bitcoin (BTC) to your Xverse wallet.
You can do this by transferring BTC from another wallet or directly purchasing it using Xverse’s built-in payment onramp powered by Onramper.

- Initiate the Bridge
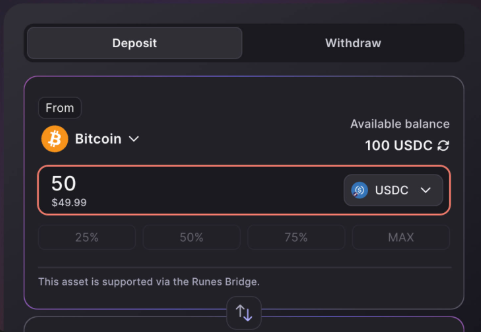
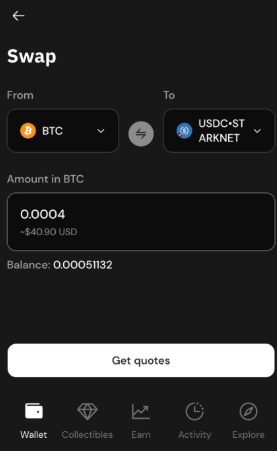
Open the StarkGate platform and navigate to the “Bridge” tab.
Choose BTC as the token you’re bridging from and an equivalent Asset Rune (e.g., USDC•Starknet) as the asset to bridge into.
For a smooth Starknet to Bitcoin bridge experience, confirm and approve the bridge transaction request in your Xverse wallet.
- Review Fees and Approve Transfer
Check estimated gas fees for both the Bitcoin and Starknet networks.
Bitcoin transactions generally involve higher processing times due to block confirmation requirements, while Starknet processes transactions faster.
Once satisfied with the details, click “Continue transfer” to finalize the bridging process.
Final Thoughts
Bridging Bitcoin from Layer 1 to Starknet is now easier than ever thanks to tools like the Xverse wallet and the StarkGate bridge.
Whether you’re looking to reduce fees, speed up transactions, or tap into the growing ecosystem of BitcoinFi, this setup gives you the tools to do it safely and simply.
Mastering bridges like this one is a key step in unlocking Bitcoin’s full potential in the decentralized ecosystem.